
Have you ever needed to upload multiple large files to your WordPress website or modify file permissions? By default, WordPress’ back-end doesn’t allow you to bulk upload media files or modify file permissions. However, File Transfer Protocol (FTP) enables WordPress site owners to access the web server directly to take care of these tasks and more.
In this post, we’ll cover the basics of FTP and discuss why you might need to use it for your WordPress site. We’ll also recommend three of the best FTP clients for WordPress users. Finally, we’ll wrap up with a quick tutorial on how to get started with WordPress FTP.
Let’s get right to it!
An Overview of FTP
FTP is a network communication protocol that gives you direct access to a remote web server. You can use FTP to transfer files between your computer and the server, modify file and directory permissions on the server, download files from the server to your computer, and more. In a nutshell, FTP enables webmasters to manage files on a web server without having physical access to the server.
FTP was developed in the 1970’s by an MIT student with the purpose of allowing files to be securely transferred between host servers and client computers. Since then, it’s undergone several revisions as the internet has evolved. FTPS and SFTP are secure alternatives to the original FTP specification which take modern-day internet security concerns into account.
Why You Need FTP for WordPress
Over the course of 12 years, WordPress has grown tremendously into a complete content management solution. In fact, it is entirely possible to build and maintain a WordPress website without ever having to fire up an FTP client.
You can create content, upload files, and even add custom CSS and PHP code to your website files right from the WordPress dashboard. At this point, isn’t it safe to say that WordPress users don’t need FTP at all?
Well, no. As powerful as it is, the WordPress backend can’t handle everything.
The best example of something WordPress can’t deal with on its own is the notorious White Screen of Death error which leaves you with no choice but to use an FTP client. Troubleshooting this issue and other like it is one of the major reasons why you can’t afford to dismiss FTP altogether. When your site takes a turn for the worst (which almost all do sooner or later) an FTP client will prove to be invaluable.
Here’s a quick rundown of four common scenarios that would call for the use of an FTP client:
- Migrating your WordPress website to a new web server.
- Deleting or deactivating plugin and theme files which are causing compatibility issues.
- Modifying the wp-config.php file after migrating WordPress, changing your database prefix, or to turn debugging mode on or off.
- Adjusting file and directory permissions.
Now that you know why you need FTP, let’s get you up to speed.
3 Great Free FTP Clients
We’ve handpicked three of the best FTP clients for you:
- FileZilla: FileZilla is a free, open source FTP client for Windows, Mac, and Linux. It features a drag-and-drop interface making it incredibly easy to use. If you’re starting out with FTP for the first time, we recommend going with FileZilla.
- Free FTP: Free FTP is available for Windows computers only. It comes with drag-and-drop functionality, one-click backups, and file tracking.
- Cyberduck. Cyberduck is a popular FTP client for Windows and Mac systems with a blazing fast FTP core. It enables users to integrate with cloud storage space and features bookmarking functionality to make file uploading more organized.
Pick an FTP client and install it. For this tutorial, we’ll be using FileZilla and, for the sake of simplicity, recommend that you do the same. Next, we’ll show you how to set up and start using WordPress FTP.
Getting Started With WordPress FTP
Before you fire up an FTP client and start tinkering with your website files it’s critically important to backup your WordPress website. Nothing we’re going to show you today should cause even a second of downtime, but it’s always better to play it safe.
To configure an FTP client to access your hosting account you will need two pieces of information:
- An address to access your web server. Typically you will either use a dedicated IP address or your website domain.
- FTP login credentials.
Let’s start by figuring out your credentials.
Locating Your FTP Credentials
Most hosts will create FTP credentials for you when you sign up for hosting.
If your host uses cPanel – and the vast majority of popular hosts do – then you already have FTP credentials. You can simply use your hosting account username and password as FTP credentials. However, if your host does not offer cPanel, then you may need to create an FTP account.
You can create an FTP account by logging into your hosting control panel and navigating to the FTP section. Find the option to create or add a new account and select a username and password. When you create the account, make sure you provide access to the directory that contains your website. In most hosting configurations, you will need access to the directory called public_html.
Next, you can set a value for Quota which limits the amount of data you can transfer or go with Unlimited to transfer files without any interruptions. Click Create FTP Account once you’re done.

Adding an FTP account through cPanel.
With your FTP credentials in hand, it’s time to locate your FTP host address.
Adding an FTP account through cPanel.
Locating Your FTP Host Address
If your host uses cPanel, once again, things are thankfully easy. Just use the primary domain name associated with your account as your FTP host address. For example, if you signed up for http://www.yourawesomedomain.com when you created your hosting account, just use yourawesomedomain.com as your FTP host address.
Another option is to use a dedicated IP address. Not all hosting accounts include a dedicated IP address, but if you do have one you can locate it by logging into your hosting account and navigating to the IPs section.
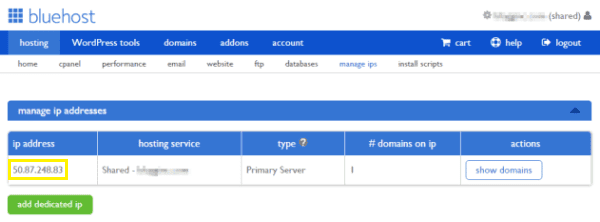
Find your WordPress website’s IP address from your site’s cPanel.
If all else fails, you may need to reach out to your host’s customer support department or do some research in their knowledge base to determine the appropriate FTP host address.
Find your WordPress website’s IP address from your site’s cPanel.
Configuring Your WordPress FTP Client
Now that you know your FTP host address and credentials, it’s time to fire up FileZilla. Launch the FileZilla client, enter your FTP account details, and click the Quickconnectbutton to establish a connection. As you’ll see in the image below, we’re using a dedicated IP address, but enter your FTP host domain in the Host field if you don’t have a dedicated IP.
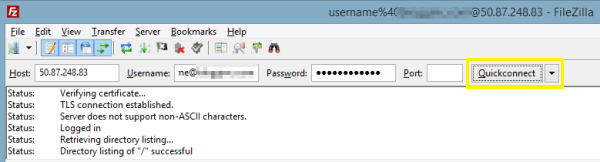
Enter your FTP account’s login credentials to establish a connection.
If your FTP connection is successful, you’ll see the Status updated to Directory listing of “/” successful.
That’s all there is to it. You’ve established a connection between your hosting account and FTP client.
Enter your FTP account’s login credentials to establish a connection.
Transferring Files Through FTP
FileZilla’s interface is divided into two sections: local site on the left and remote site on the right. Once you click on a folder on either side, the box below it will populate with the folder’s contents.
FileZilla lets you transfer all kinds of files from any folder on your local computer to any directory on your web server.
In order to start transferring files to your remote site from your computer, all you have to do is drag and drop them from the local site box to the remote site box.
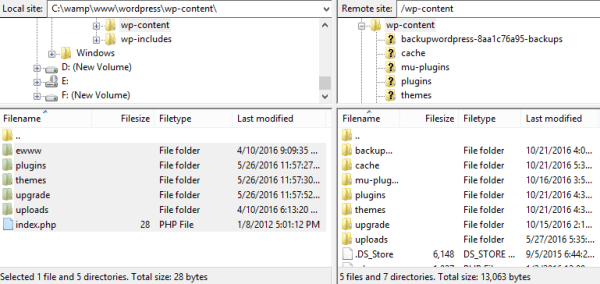
Select all the files you want to transfer and drag and drop them into the remote site box.
At the very bottom of your FileZilla FTP client’s screen, you’ll notice three tabbed sections:
- Queued files: Queued files are those that you’ve selected to transfer and are in the process of transferring from your local computer to the remote web server.
- Failed transfers: These files are those that were selected to be transferred but were not successfully transferred to the remote server.
- Successful transfers: This tab displays a list of the files that were successfully transferred from your local computer to the server.
If your files were successfully transferred then you’re good to go – the selected files are now uploaded to your WordPress website’s server.
Select all the files you want to transfer and drag and drop them into the remote site box.
Uploading Media Files in Bulk
WordPress doesn’t recognize media files in the Media Library that were uploaded from anywhere other than the Media Library itself or via the Add Media button. This means that when you upload media files through the FTP client to your site’s Uploads folder then they won’t appear in the Media Library.
One way to work around this problem is to install the Add from Server plugin and register them from there.
Managing File Permissions in FileZilla
Another task that is commonly managed via FTP is changing file and directory permissions. To change file or directory permissions navigate to the directory or file you wish to manage, right-click to open the contextual menu, and select File permissions…from the bottom of the menu.
Adjust permissions using the checkboxes or by entering a numeric value in the appropriate field. Click OK and the new permissions will take effect.
Editing a Website File via FTP with FileZilla
One of the most common WordPress FTP tasks is to open and edit wp-config.php. To do this, first, locate the file. In a standard WordPress installation, you’ll find it in your website’s root directory.
Use the local site section of FileZilla to locate your computer’s desktop, and then drag the wp-config.php file from the web server to your desktop. This will copy the file to your desktop.
Before editing your file, create a second copy of it on your desktop with a slightly different name. Simply renaming the copied version x-wp-config.php will do. Now, open the properly-named version (wp-config.php) and edit it to your heart’s content.
The last step in the process is to go back to FileZilla and drag the updated version of the file from your computer desktop back to the web server. When you do, FileZilla will ask you to verify that you want to overwrite the file on the server and provide several options. Select the Overwrite option and click OK.
Now, access your website to make sure that the intended change has taken effect. If something unexpected occurs, use the backup copy of wp-config.php on your desktop to restore your site’s original wp-config.php file.
Conclusion
Getting started with WordPress FTP is simple. And once you’re up-and-running you’ll be able to take advantage of WordPress FTP capabilities that exceed the default capabilities of the WordPress backend, such as:
- Transfer files to and from your web server with ease.
- Upload media files in bulk and then use Add From Server to import them into WordPress.
- Manage file and directory permissions.
- Edit WordPress files such as wp-config.php while troubleshooting WordPress issues.
Do you have any questions about managing your WordPress site via FTP? Get in touch in the comments section below!
FOR MORE UPDATES BROADCAST SERVICE , Type "S2Y YOURNAME" AND SEND US ON
FOR MORE UPDATES BROADCAST SERVICE , Type "S2Y YOURNAME" AND SEND US ON