
Introduction
Let’s Encrypt introduced free SSL certificates quite some time ago. It made possible for website owners to offer encrypted HTTPS connection for their visitors totally free of charge. Before Let’s Encrypt, the only way to get a valid SSL certificate was to purchase it from a seller.

Update:
Hostinger, now offers cheap SSL certificates for a lifetime. It’s worth to check this offer, if you are serious about the protection of your website and don’t want to deal with tricky SSL installation and setup.
Let’s Encrypt SSL certificate can be installed with just a few lines of code on a VPS or dedicated server, however, installation on shared hosting accounts is still a bit complicated (unless it uses cPanel).
Hostinger doesn’t yet have an auto-installer for Let’s Encrypt SSL certificates (we are working on this), but there is a workaround – it can be installed manually using ACME client written in PHP and composer.
This tutorial shows how to install free SSL from Let’s Encrypt on Hostinger shared hosting.
Table of Contents
- What you’ll need
- Step 1 – Enabling SSH Access
- Step 2 – Installing ACME client and Composer
- Step 3 – Generating SSL Certificate
- Step 3 – Installing Certificate via Hostinger members area
- Step 4 – Checking expiration date and renewing SSL certificate
- Conclusion
What you’ll need
Before you begin this guide you’ll need the following:
- Hostinger Premium or Business account.
- SSH client.
Step 1 – Enabling SSH Access
SSH access is required in order to install SSL on shared Hostinger account. By default it’s disabled, but you can easily enable it by following these steps:
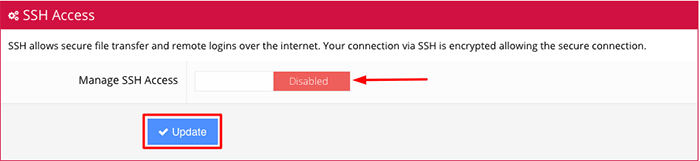
- Access Hostinger control panel and navigate to SSH section.

- Click on Disabled to change status to Enabled. Hit Update button.
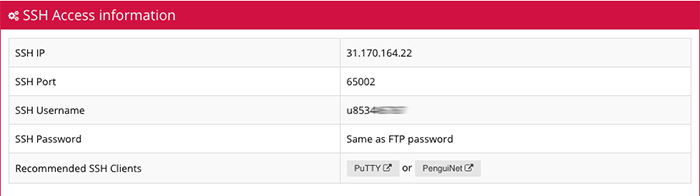
- The page will refresh and you should see information required to connect via SSH. Write it down as you will need it in the next step.
Step 2 – Installing ACME client and Composer
We will use ACME client written in PHP and composer to generate Let’s Encrypt SSL certificate.
First of all, you will have to connect to your hosting account via SSH and download all required components. If you are running macOS or Linux, you can use terminal to connect via SSH, Windows users can take advantage of Putty SSH client.
- Connect to your hosting account using SSH information from Step 1.3. In our example, it would be:
ssh x123011738@31.170.164.22 -p 65002 - Clone acme client from github repository. Cloning can be done by executing the following command:
git clone https://github.com/kelunik/acme-client - Access ACME client directory:
- Download and install the composer:
Step 3 – Generating SSL Certificate
Once you have downloaded and installed ACME client and composer, you can proceed and generate free SSL from Lets Encrypt. Firstly, register an account by running this command:
php bin/acme setup --server letsencrypt --email your@email.comNote that you need to change your@email.com to your actual email.
The process of generating SSL certificate is pretty straightforward. Execute the following command:
Change yourdomain.com to your real domain name and x123011738 to your actual username (you can check it on Step 1.3).
If certificate was issued successfully, you will see the following message:
ACME client generated certificate and private key files. Unfortunately, installation cannot be done via SSH due to security restrictions. Therefore, you first need to manually copy certificate and private key files to your computer. It can be done using simple copy / paste method. Firstly navigate to the directory where private key and certificate files are stored:
cd /home/x123011738/acme-client/data/certs/acme-v01.api.letsencrypt.org.directory/yourdomain.com
Use
cat command to see contents of fullchain.pem file:cat fullchain.pem
Copy the part marked in red and save it in a text file on your computer. Name the text file certificate.txt.

Now do the same with private key:
cat key.pem
Copy the private key (as shown in the screenshot) and save it in a text file as well. Name it privatekey.txt.

The hardest part is over. You can now proceed with the installation of SSL certificate.
Step 3 – Installing Certificate via Hostinger members area
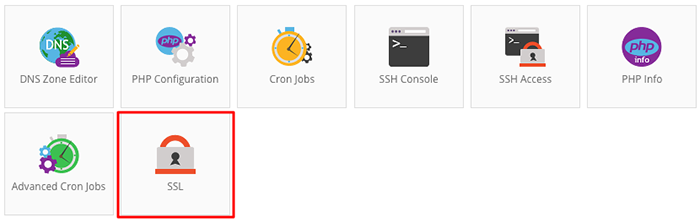
At this step you should already have certificate and private key saved in txt files on your computer. The final step is to install SSL certificate on your hosting account. It can be done via SSL section:
- Access Hostinger members area and navigate to SSL section.
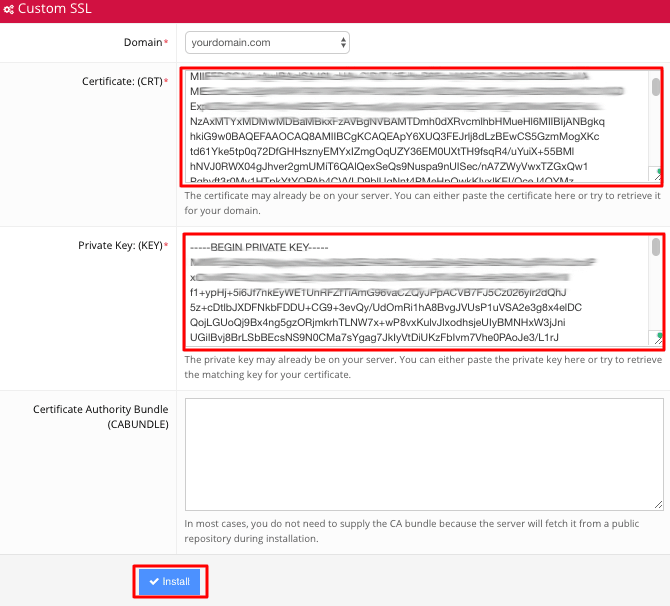
- Select the domain from the drop down menu for which you want to install SSL certificate.
- Paste contents from certificate.txt to Certificate:(CRT) and contents from privatekey.txt to Private Key:(KEY) fields. Press Install button once you are done.
- Once the installation is complete, you will see a success message.

That’s it, you have successfully installed free SSL from Let’s Encrypt on shared hosting account. Your domain name will now work via HTTPS protocol.
Step 4 – Checking expiration date and renewing SSL certificate
Let’s Encrypt SSL certificates are set to expire every 90 days. You can check its expiration date via SSH using the following command:
You can also try to automatically renew Let’s Encrypt SSL certificate with a cron job. For example, in order to automatically renew SSL certificate, you can set cron job to run the following command every other month:
On Hostinger, cron jobs can be created on Advanced Cron Jobs section. You can use the following settings:
- Common Option(s) – Once a month (0 0 1 * *)
- Minute(s) – :00 top of the hour (0)
- Hour(s) – 12 a.m. Midnight (0)
- Day(s) – 1st (1)
- Month(s) – Every other month (*/2)
- Weekday(s) – Every weekday (*)
Conclusion
Let’s Encrypt SSL certificates are great if you want to run your websites on HTTPS but don’t want to invest any money. This tutorial intended to show you a workaround you can use to install free SSL from Let’s Encrypt on shared hosting account.